Showing posts with label meaning. Show all posts

Friday, May 16, 2014

Something about developing.

As far as we have come, we may be ready to start developing. For now, we know how to use the camera, we also told something about darkrooms, and then a little about developing tanks. The next logical step is going to be doing the develop itself.

The process to develop a photosensitive material is the procedure, in which, we are going to bring the images that are stored in the film, and making it no longer sensitive to light. 

You may look on internet, and almost everyone is going to have it's own developing process, this is because we are free to experiment as much as it suits one. that is why I would like to explain what I think is the standard process. I also will highlight the steps that must be done, and explain why some are kind of optional.

  1. Presoak
  2. Develop*
  3. Stop Bath
  4. Wash
  5. Fix*
  6. Wash
  7. Hypo solution
  8. Final rinse*
  9. Coating
  10. Dry
The entries marked with the * means that they must be done. 

Presoak

This step is intended to be done with water. This is to clean the film from any dust particle, finger marks and humidifies it so the developer will not act suddenly. We need to agitate the tank, with water, at least for 30 sec.

Develop

The whole process is around it, and this is going to be the chemical in charge to bring the images stored in the film and become visible, but not just free from light sensitivity (if we take our film out of the tank it will be ruined as the light will still react with the emulsion). 

But when you go to the photo store, and you say to the store clerk: "Could you give me a developer?" he immediately will reply "Which one Mr./Mrs.?". So yes, there is going to be a developer from each major brand, and within the brand they may have several, and each one could be able to be mixed in different ways… what a haze!

A starting point, and one that I recommend most, is to search our film's user manual. This ones do not come with the film in the box, so google it! (the key words are the brand, the name of the film and fact sheet). But for now on I will explain about my own experience with the developers I know. As a big part of the whole, most developers are designed so they work perfect at temperatures between 20 to 24 º C (68 to 75.2 F). I most often try to use the developer as nearest to 20 ºC (68 F), in future references this is going to be the temperature.

Also very important to have at hand, is the developing chart for our film, this one most of the times comes with the original packaging.

Types of developers

Single use

There is a family of developers that will only work for once, and then we have to dispose them. The most popular of this kind of developers is Kodak's D-76. This developer is quite easy to mix, we only heat 3 liters (0.79 US gal) of  water until 52 ºC (125.6 F), pour the powder that comes in the packaging, once all mixed ad more water, 0.8 l (complete the US gallon). When the temperature goes down to room temp. ca. 20 ºC (68 F), we now have a developer in stock, meaning that is at its purest dilution. We are going to be able to mix it with water so we reduce its developing power for making more "softer" processes, in which we could bring more details, but at cost of our contrast.

In this type of developers we may see something like this on the developing chart 1+0, 1+1, 1+3. What do these mean? This is a sum, in which the first number is the quantity of developer we need plus the quantity of water we are going to use to dilute.

1+0 means that we are only use the chemical
1+1 means that we are going to use half developer, half water
1+3 means that we are going to use one part of developer and three of water

Are some developers like Agfa's Rodinal (I do not like it) that uses dilutions like 1+59, 1+60. But how do we know how much do we need. Well, in the bottom of the plastic tanks it says something like 135 x 1 = 300 cc, means that for one 135 film we need at least 300 cc (cubic centimeters) of developer, 100 ml (nearly 10.2 fl. oz.), so 300 is our goal, and we want to do a 1+3 dilution. The first step is to divide our goal by the sum of the 1+3, is 4, so 300 divided by 4, that equals 75. The next step is: we need one of developer plus 3 of water, 75 multiplied by 3 is 225, we take that and then ad the 75 of developer we needed an now we have our developer in 1+3. Single metal tanks need 250 ml (8.5 fl. oz.).

Once our developer is ready for the job, we pour it in the tank, put our clock in the time the chart indicated, at the right temperature, and we start the process. Regardless the type or the brand of developer one of the most recurrent habits is to agitate the tank, there is fact sheet recommendation, that tells us to agitate the tank 10 seconds each minute. You can agitate more often, just to blow up the grain, but you can not do it, this helps that the development process occurs as even as posible. As we cycle the particles inside, moving fresh chemical near the emulsion.

Just one the clocks hits zero, we toss it to the drainage. And be ready to pour the next chemical, but for now is time to explain about the other kind of developer.

Multiple use

It may seem a little bit logical, this developers are able to work even after certain number of uses, this developers are once prepared and there is nothing else to do. The most common developers are Kodak's HC-110 (dilution B, is for film) and T-Max, Ilford's ID-11 and Microphen. These four can only hold 10 processes, after the tenth the results are uneven.

The only problem with those is that with each use the developer looses it power, but it can be compensated with more time. For example with HC-110, we have used it like 6 times, for each use we add 10 seconds to the chart time, this means, if the chart says, the film develops with 5 min, we add sixty seconds to it, a whole minute, our develop time will become 6 min.

While with Ilford is a little bit different, in this case we have to ad percentages, for example it is going to be the 8th process, so I have to ad the 70% of the original time, in this case 8 min. the 70% of 8 is 5.6 min, so we have to sum it to the original time, 13.6 min is our developing time.

Just as a little note, ID-11 and Microphen can be diluted, if we do so, they will become single use developers.

When you become more familiar there exist other classifications to developers, multi-propuse, fine grain, being the most common. In this case I recommend giving each one a try to find the one that likes you most.

Stop Bath

This chemical is the easiest one to prepare and can be switched with vinegar. The job is going to do, is to stop the effects of the developer, so our developing time comes as closer as the chart says. It will only work for 30 seconds and we have to agitate all the time.

Wash

This little wash is to clean all the residues could be left during the developing and the stop bath, it is made with tap water, and it lasts 30 seconds with constant stir.

Fix

The second most important step during the process, this chemical will transform the silver halides to silver salts, that are no longer sensitive to light. So once the film is bathed with this, it will become light safe, you cant take it out and nothing will not happen. It will also give the longevity to your processed film, a well done fix will make your film endure at least 20-30 years.

The fixer I found most easy in Mexico City is the Rapid Fixer from Kodak, I do not know any other, so I am not able to tell you if is fast or no, but I can tell you that it is working properly or not. The time I recommend for the fixing process is to let it be in the tank for at least 10 minutes, with the same agitation scheme as with the developer. You can take out the film and if it is still purplish it still needs fixer, if more than 20 min with this, that means you need to change your fixing solution with new.

Rapid fixer for film is easily prepared, it comes in two bottles, the fixer and a hardener, use 1.9 liters (0.5 US gal.), pour the fixer bottle, mix it well, pour the hardener bottle, mix well and ad enough water to fill 3.8 liters (1 US gal.). This will endure as long as six months in a well closed bottle.

Hypo solution

The fixer tend to left undesired residues on the film, that will cause stains in the emulsion, so this Hypo solution will help to wash it quickly. Before pouring the Hypo, do a wash, just like the one before the fix process. 

This Hypo, here, it is sold in small bags, to prepare just one liter (33.8 US fl. oz.), just heat water, pour the powder, mix it, and presto, you have Hypo solution.

During the process it just needs two minutes with the same agitation scheme as the developer.

Final rinse

This is done with tap water and the time will depend on the usage of Hypo solution, if it was used you have to add water for five minutes, changing the water each minute. With the same scheme of agitation as the developer.

If you have not used Hypo solution, be prepared to left the film almost a day in water, and keep changing the water at least one hour, agitation… try to do it from time to time. This step must be done to wash the film from any residue from the steps before.

Coating

With time, Kodak, created a chemical called Photo-Flo, that is aimed to protect from small scratches and make the emulsion static free, so dust will not stick to it. Also gives the film a shiny finish to it. In this case left it one minute and any agitation, this chemical is soapy, so it will form foam if stirred, so avoid it.

Dry

The last part of the whole process, find a place to hang the film, cloth clippers are good for this, and do not forget to use a counter weight to keep the film stretched and avoid the natural curvature. The drying time will depend on where do you leave it, but for most of times it will take 30 min to one hour.

This has been the steps I usually do to develop a film, as said before there are some steps that are not essential, but aid in making the process cleaner and leaving better results. The next question is how to keep you film, in the US is a brand called Print File, they manufacture special sheets with sleeves to preserve the strips. I think they are the most easy to find and economic too. Just do not forget to find a dry cool place at your house to preserve your films, as humidity will damage them.

Wednesday, April 16, 2014

And now… what?

We have discussed about film sensibility, shutter speed and aperture, all of which will have a different effect on how our image will be. But now, if we are using light and we are using all those parameters, for whichever reason, how do we know how many light is the right amount. Well, said in greater words, ISO is going to be the one who decides, but photographers will not talk about lumens or luxes (units for measuring light) but instead of that, they will explain everything with shutter speeds and aperture values. If you are a digital photographer in the making, do not use ISO Auto, as this will not let you advance. Film photographers, well, ISO can not be changed in the whole thing, so do not worry about that.

But before we continue on, we need to know how we measure our source material, light. So there are essentially two ways for doing so. Incident or reflected, one is more accurate than the other, but in the other hand the other is more practical. Lets go in parts.

Incident light

As far as mankind knows, light travels trough space but it tends to dissipate, and we can see this phenomena in just any lamp, as we put it higher it will draw a bigger circle but its "power" to illuminate will diminish, this happens because light travels in any directions, and sum to that the fact that there is also air, that has particles floating in it. Where are we going with this, that depending on how far the light source is, the intensity of it will be different. In the case of natural light, the Sun, it is a little bit irrelevant, but with artificial sources this is the most important consideration. 

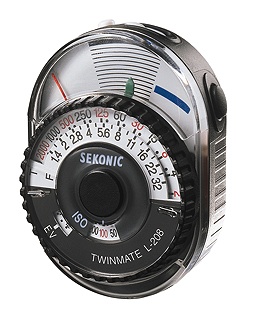
In this case of light metering, what you are going to buy is a hand expose meter, the most basic of this devices will have a light sensitive zone. Older models, had the look of an old voltmeter, as they used selenium, an compound that exposed to light will generate a voltage, so depending on the quantity of light the voltage will vary.
Many of this expose meters, you just set the dial in which the green and the red lines were one over the other, and then read the combination below. As you can see, it has a speed and an aperture scales, so when you made both were aligned, you were able to choose, ƒ 8 @ 1/60 (using the image as reference) but you also get something called, equivalent measures, we will discuss that later.

Most modern light meters are digital now, and most of them have at least three basic functions, ambient light, flash and flash with cord. The ambient light, well, may seem obvious but is when we are going to meter, continuous sources of light, like the sun or light bulbs. The other two functions will depend, in one, the device, will be waiting for the flash to fire and then measure, and the one with the cord, the apparatus is connected directly to the flashes and send the signal so it fires them.


In both, analogue or digital, we need to face the light sensitive part to the light source. As we are using a device solely to meter, this is why is the most accurate way of getting the exposure value, aperture and speed, on one ISO sensibility.

The downside of all of this, is that you have to buy an extra, that the cheapest are between $150-$200 USD, new, as always you can go to flea markets, swap meets, and so and maybe have luck and find one in great conditions. But do not fear my fellow readers, since a long time camera manufactures had come with a nice solution.

Reflective light

Last method worked by recieving light directly from the source, this one will work differently, and works just like our eyes do. We see because light is reflected from the objects, white light contains all the colors within it, we see the colors of things because they absorb the other colors and reflects the color they are. Inspired on this way of metering light, cameras from the 70's and on, were manufactured with an expose meter integrated with them. Some were like a crystal thing with bubbles attached to the camera, but other were more advance and the term TTL became famous, this means Trough The Lens, this meant that the light that passed trough the lens made the measure. This kind of metering was so accepted, because the expose meter was showed in the viewfinder, mostly in SLR's, so the photographer has a fast glimpse if it need more or less light for his/her shot.

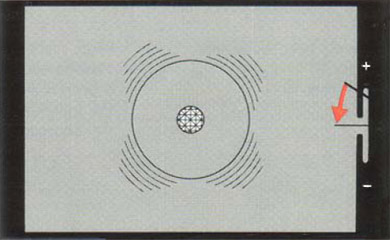
Depending on how old and brand the camera is, the expose meter is displayed in different ways, some are very simple while others are quite trouble some. The most commons are like this:


In this case of expose meters, there is a needle, a plus a minus sign, and the middle mark, if the moving needle is charge to the minus, it means that your original settings are not letting enough light to pass, just compensate with speed or aperture letting more light pass (just move one, do not move the two freely), do this until, the needle stays very close the the middle mark. Doing so, we are going to have a well exposed photo, if the needle is in the less zone this means that our photograph is going to be underexposed, meaning that we let pass less amount of light that the one needed. This will lead to dark pictures with textureless darks and grey whites. In the other hand, leant to the plus side, we will end with an overexposed image, this will make that our blacks will not be blacks and our whites will not have textures. But as a safety for each photo it is better to be slightly overexpose, doing so we are going to force to the negative to receive information, that latter will be visible in the print.

There are other kinds of displays, there is one just with the plus, the minus and a dot. In this case each sing will shine, and when the dot shines the exposure is right. But there are some that are not as easy to get, there are some without lesses and pluses, some Minoltas used to have some like this:


In this case of exposure meters the needle in function of the aperture selected will move to the most suitable speed, at the beginning is a little bit confusing, but it all depends when both, speed meets the aperture, in this kind of expose meters, at the start, is hard to tell when is over or under exposed.

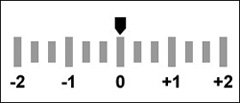
Newer expose meters are more like a ruler, with a mid-point, less or plus, but showed in steps, and some in half or thirds of a step. Canon and Nikon have something like this:


But this way of metering is not fool proof, it will depend highly on the lens mounted, how big is the metering zone inside the camera, or in modern cameras, how many metering dots has and the most important of all, it uses reflected light and not everything reflects the same amount of light, a white cup compared to a black one, the light one reflects more light than the darker one, and so we could end with a failed metering. In the next to images this is going to be demonstrated.
When you meter over something bright, like the white cup, the camera thinks is overexposed, and tells you that you need less light, resulting in an underexposed image, also se how white became gray.

When you meter over something dark, the camera thinks the image is underexposed, and tells you to let more light to pass, this will result on an overexposed image, see how whites start to lose details, and also textures.

But do not fear, there are ways to achieve the right measure, and is not with any fancy stuff, is even a little bit old in fact. All the cameras' expose meters are calibrated to something called Grey at 16% or medium gray. So if the camera is expecting to see this gray, why not to use something that has this reflectance, here is when the Grey Card comes to hand, this cards can be found in any photographic supply store, it is also wide used in digital photography (not precisely to measure but for Withe Balance). They come as just a cardboard card with a gray side or be more sophisticated like a cube, that also has white, black and shiny things, more oriented to digital photography.

This image was metered using a grey card, see how balanced are the whites compared to the blacks, and compared to the last to images, is the one where Beatles could be read clearly, but without losing textures.

The grey card was just showed, and compare it with the previous image, in which we do not need to show it to have a nice photograph.

To use the Grey Card we only need to put it in front of the lens, parallel to the lens front face and adjust speed or aperture so the meter is in the center, well expose, zone. Then we proceed to take the card of the sight of the lens and proceed to take the photograph. If we do not have a grey card at hand, our body has a part that reflects almost the same amount of light than a grey card, and is the palm of our hand, so we could put our hand in front of the lens, adjust the exposure so the meter stays in the zero zone, take the hand out of the zone and take our pic.

Friday, April 11, 2014

The last part of the exposure triangle: ƒ numbers.

Last week’s post was all about shutter speeds, and if we remember what was all about, it explained how shutter speed affects how moving objects may or not may be seen, stilled or blurry. 

This post is going to be the finale of the triangle exposure, next week I am going to be explaining how to mesure light, so we will be able to know how much light our photograph is going to need.

Before shutter speeds existed, the ƒ numbers were already invented. The photograph camera as an imitation of the human eye, and the knowledge about stenopeic (from greek, stretch opening). But the human eye has something called iris, which, controls the pass through light just by altering the area of light that is passing through, but the eye is capable of maintaining most of the things focused thanks to the ability of having a focal length, while in the stenopeic camera, the little opening is the focal length itself. So adding arrangements of crystals, we are forcing the camera to be able to work almost like the human eye. Also cameras were able to have more sophisticated crystal arrangements, and with it different focal lengths without the need to change the size of the camera. And with it, the lenses gained the ability to have and iris, but in photography are more often called diaphragm or ƒ numbers.

The ƒ numbers are defined by the area formed by the iris, this means the area of light that is going to pass trough and so, also the go by double the area or the half of area, but defining this is not like the ones in time or ISO values. The ƒ number is defined as:

ƒ = √(2n)0≤n<∞

Square root of two power of n, in which, n  is equal and greater than cero and less than infinity.

So in this case n is the number that is going to go in increments of 1, starting from zero. Doing this so, is going to give us approximate numbers to the ƒ numbers. The most common are:

ƒ 1.4
ƒ 2.0
ƒ 2.8
ƒ 4.0
ƒ 5.6
ƒ 8.0
ƒ 11
ƒ 16
ƒ 22
ƒ 32
ƒ 64
ƒ 90.5
ƒ 128

From top to below the quantity of light that is passing trough is the half, so ƒ 1.4 lets pass more light than ƒ 2.0. And just like the last article mentions it, they had become with half steps or third steps. Like ƒ 1.8 is half step of ƒ 1.4 and ƒ 2.0.


The second most important of ƒ numbers is the Depth of Field (DoF)


Just like the shutter speed, the ƒ number will modify the end result of a photograph, but in this case the difference is about the sharpness of what the lens is going to see. And that is called the depth of field. The DoF, to abbreviate, is the distance in front of the lens that is going to be sharp, this distance will be around the the focused object, this will apply in front and behind it.

This happens because wider openings will let pass "irregular" light, that is going to make that light coming from places outer the DoF, be projected in the film as blurry or diffused, as we go closing the opening, this will force light to pass more concentrated trough the lens, something like a stenopeic camera, and increases de DoF, making most of things defined.

This diagram shows how the DoF go in front and behind the focused subject.
The next images are going to illustrate how DoF changes, depending on how wide or closed the diaphragm is.


ƒ 1.8

ƒ 2.8

ƒ 4.0

ƒ 5.6

ƒ 8.0

ƒ 11

ƒ 16


As you can appreciate, as the aperture goes smaller the quantity of sharp objects increase, at ƒ 1.8 only the elephant is focused, but everything behind and in front of it is "unfocused", above ƒ 11 the Crystal Frog and the Golden Cat became sharp enough, but if you put attention to the background, the line behind is kind of blurry, maybe the next aperture value will define it.

In more serious photos, controlling the DoF will force the viewer to concentrate in only one thing, as you can see in the first images, even if the Golden Cat shines in the background, your attention concentrates on the Elephant, so mastering this technique for portraits is quite a rule, so your subject will be over all the things.

In the other hand if we try to do a landscape or we want to see the most details on everything we are going to focus on smaller apertures, preferable above ƒ 5.6, as in the example, almost all the toys are seen clearly.

There are other ways to have shallow DoF, but that depends highly in the focal length, and will be discussed on other entry.