Showing posts with label exposure. Show all posts

Wednesday, April 23, 2014

Equivalent lectures

I hope, my stem readers, that you have practiced how to read the expose meters on your cameras. If you still have some doubts, please be confident enough to send me a comment.

When you master how to read the values, now you are prepared to make equivalent lectures. This means, that you are able to change shutter speed or ƒ numbers to accommodate your needs or the end result you wish, without changing the quantity of light that is going to get into the film. Maybe by now, you are going to be able to have an idea if you know what each light step means.

This is going to be a little bit more practical than before. First of all, lets imagine that a friend of us has a hand expose meter, and he (or she) measures the light on his face, and the displays says: s 1/250 @ ƒ 4.0. In this case we want to blow away the background, in other words, make it unfocused. How do we do that? Easy one! We just open the lens aperture, in this case we are going all the way to ƒ 2.0. If we write an scale:

ƒ numbers   1.4   2.0   2.8   4.0   5.6   8.0   11   16   22

Speed   15   30   60   125   250   500   1000   2000

Note: I did not write the 1/ of the speed

Each number is a step, in which I am going to let pass the double or the half of light, so if we are in ƒ 4.0 and we want to go to ƒ 2.0, how many steps are we moving? Just two steps, but in this moment we let enter four times the amount of light to make a perfect exposure, so what do we do now? We have speed in the other hand and as we are not worried about its effect, we are going to move it the same number of steps until it compensates the light we let pass with the aperture, this means we are going to move the speed to 1/1000, as it let passes four times less light than before, and so our new lecture is going to be 1/1000 @ ƒ 2.0 and we assure a shallow depth of field as we wanted to do the portrait of our friend.

This also applies to the case in which you are more concerned about the speed, for example not letting it go below 1/30. For example, we are in a place where the Sun is about to set, the shadows are very long and dark, but we found that some places where the lights still passes trough is interesting, we make a lecture with our camera, and it says: 1/8 @ ƒ 8.0, and also we do not bring any tripod, and there is not a table at sight. 

ƒ numbers   1.4   2.0   2.8   4.0   5.6   8.0   11   16   22

Speed   8  15   30   60   125   250   500   1000   2000

Note: I did not write the 1/ of the speed

We want to be safe about shutter speed, so we want to shot at 1/60, so from 1/8 to 1/60 are three steps, in which we will not let pass much light at all, like about 8 times, so what do we do next, is compensate with the ƒ number, the same number of steps, so we let pass more light to it, from ƒ 8.0 we head to ƒ 2.8, and this way we end letting pass the same amount of light as the original reading.

The next pair of images exemplifies the Equivalent lectures.

1" @ ƒ 8.0

1/15 @ ƒ 2.0
Contrast seems a little bit different on each… but as you can observe, both have similar amounts of light on them, the only difference is how I wanted to move DoF, so only the little turtle was in focus. As you can notice both values moved five steps, if I just moved one without compensating the speed that would be blank image.

Wednesday, April 16, 2014

And now… what?

We have discussed about film sensibility, shutter speed and aperture, all of which will have a different effect on how our image will be. But now, if we are using light and we are using all those parameters, for whichever reason, how do we know how many light is the right amount. Well, said in greater words, ISO is going to be the one who decides, but photographers will not talk about lumens or luxes (units for measuring light) but instead of that, they will explain everything with shutter speeds and aperture values. If you are a digital photographer in the making, do not use ISO Auto, as this will not let you advance. Film photographers, well, ISO can not be changed in the whole thing, so do not worry about that.

But before we continue on, we need to know how we measure our source material, light. So there are essentially two ways for doing so. Incident or reflected, one is more accurate than the other, but in the other hand the other is more practical. Lets go in parts.

Incident light

As far as mankind knows, light travels trough space but it tends to dissipate, and we can see this phenomena in just any lamp, as we put it higher it will draw a bigger circle but its "power" to illuminate will diminish, this happens because light travels in any directions, and sum to that the fact that there is also air, that has particles floating in it. Where are we going with this, that depending on how far the light source is, the intensity of it will be different. In the case of natural light, the Sun, it is a little bit irrelevant, but with artificial sources this is the most important consideration. 

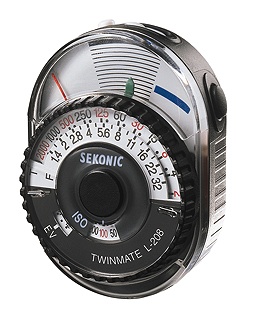
In this case of light metering, what you are going to buy is a hand expose meter, the most basic of this devices will have a light sensitive zone. Older models, had the look of an old voltmeter, as they used selenium, an compound that exposed to light will generate a voltage, so depending on the quantity of light the voltage will vary.
Many of this expose meters, you just set the dial in which the green and the red lines were one over the other, and then read the combination below. As you can see, it has a speed and an aperture scales, so when you made both were aligned, you were able to choose, ƒ 8 @ 1/60 (using the image as reference) but you also get something called, equivalent measures, we will discuss that later.

Most modern light meters are digital now, and most of them have at least three basic functions, ambient light, flash and flash with cord. The ambient light, well, may seem obvious but is when we are going to meter, continuous sources of light, like the sun or light bulbs. The other two functions will depend, in one, the device, will be waiting for the flash to fire and then measure, and the one with the cord, the apparatus is connected directly to the flashes and send the signal so it fires them.


In both, analogue or digital, we need to face the light sensitive part to the light source. As we are using a device solely to meter, this is why is the most accurate way of getting the exposure value, aperture and speed, on one ISO sensibility.

The downside of all of this, is that you have to buy an extra, that the cheapest are between $150-$200 USD, new, as always you can go to flea markets, swap meets, and so and maybe have luck and find one in great conditions. But do not fear my fellow readers, since a long time camera manufactures had come with a nice solution.

Reflective light

Last method worked by recieving light directly from the source, this one will work differently, and works just like our eyes do. We see because light is reflected from the objects, white light contains all the colors within it, we see the colors of things because they absorb the other colors and reflects the color they are. Inspired on this way of metering light, cameras from the 70's and on, were manufactured with an expose meter integrated with them. Some were like a crystal thing with bubbles attached to the camera, but other were more advance and the term TTL became famous, this means Trough The Lens, this meant that the light that passed trough the lens made the measure. This kind of metering was so accepted, because the expose meter was showed in the viewfinder, mostly in SLR's, so the photographer has a fast glimpse if it need more or less light for his/her shot.

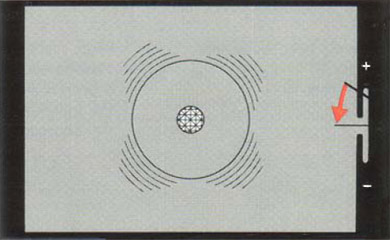
Depending on how old and brand the camera is, the expose meter is displayed in different ways, some are very simple while others are quite trouble some. The most commons are like this:


In this case of expose meters, there is a needle, a plus a minus sign, and the middle mark, if the moving needle is charge to the minus, it means that your original settings are not letting enough light to pass, just compensate with speed or aperture letting more light pass (just move one, do not move the two freely), do this until, the needle stays very close the the middle mark. Doing so, we are going to have a well exposed photo, if the needle is in the less zone this means that our photograph is going to be underexposed, meaning that we let pass less amount of light that the one needed. This will lead to dark pictures with textureless darks and grey whites. In the other hand, leant to the plus side, we will end with an overexposed image, this will make that our blacks will not be blacks and our whites will not have textures. But as a safety for each photo it is better to be slightly overexpose, doing so we are going to force to the negative to receive information, that latter will be visible in the print.

There are other kinds of displays, there is one just with the plus, the minus and a dot. In this case each sing will shine, and when the dot shines the exposure is right. But there are some that are not as easy to get, there are some without lesses and pluses, some Minoltas used to have some like this:


In this case of exposure meters the needle in function of the aperture selected will move to the most suitable speed, at the beginning is a little bit confusing, but it all depends when both, speed meets the aperture, in this kind of expose meters, at the start, is hard to tell when is over or under exposed.

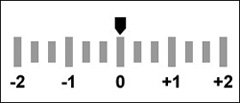
Newer expose meters are more like a ruler, with a mid-point, less or plus, but showed in steps, and some in half or thirds of a step. Canon and Nikon have something like this:


But this way of metering is not fool proof, it will depend highly on the lens mounted, how big is the metering zone inside the camera, or in modern cameras, how many metering dots has and the most important of all, it uses reflected light and not everything reflects the same amount of light, a white cup compared to a black one, the light one reflects more light than the darker one, and so we could end with a failed metering. In the next to images this is going to be demonstrated.
When you meter over something bright, like the white cup, the camera thinks is overexposed, and tells you that you need less light, resulting in an underexposed image, also se how white became gray.

When you meter over something dark, the camera thinks the image is underexposed, and tells you to let more light to pass, this will result on an overexposed image, see how whites start to lose details, and also textures.

But do not fear, there are ways to achieve the right measure, and is not with any fancy stuff, is even a little bit old in fact. All the cameras' expose meters are calibrated to something called Grey at 16% or medium gray. So if the camera is expecting to see this gray, why not to use something that has this reflectance, here is when the Grey Card comes to hand, this cards can be found in any photographic supply store, it is also wide used in digital photography (not precisely to measure but for Withe Balance). They come as just a cardboard card with a gray side or be more sophisticated like a cube, that also has white, black and shiny things, more oriented to digital photography.

This image was metered using a grey card, see how balanced are the whites compared to the blacks, and compared to the last to images, is the one where Beatles could be read clearly, but without losing textures.

The grey card was just showed, and compare it with the previous image, in which we do not need to show it to have a nice photograph.

To use the Grey Card we only need to put it in front of the lens, parallel to the lens front face and adjust speed or aperture so the meter is in the center, well expose, zone. Then we proceed to take the card of the sight of the lens and proceed to take the photograph. If we do not have a grey card at hand, our body has a part that reflects almost the same amount of light than a grey card, and is the palm of our hand, so we could put our hand in front of the lens, adjust the exposure so the meter stays in the zero zone, take the hand out of the zone and take our pic.

Wednesday, March 26, 2014

How to expose

For many this is going to be the core of all the course, because the Exposition is something that has not changed in the digital realm. As for me the concept that I like most is the Triangle of Exposure.

It is like the Combustion Triangle, in which there are three concepts that will support the main idea. I have acknowledge of other concepts like the one with the tap and the bucket, if you want that I explain it leave a comment. To start with, the three concepts that put together the Triangle are:
  • Film sensibility (ISO/ASA/DIN)
  • Shutter Speed
  • Lens aperture
Each one has its distinctive features, effects and priorities, which all will depend on how you would like that your photography is going to be.

I am going to discuss it in the order I have listed them. Essentially because in the film we are restrained to have ONE and only ONE film sensibility, there are some considerations if we intend to do forced or counter-forced expositions, and even in those cases, we have to shot the entire roll in one sensibility, not as in digital, in which we can change at will the sensibility to adjust to our needs in each shot.

This is one of the reasons I like more film photography, you have to choose what film to use, and you are restrained to make each one count as the good, even if you do not enlarge it.

Film sensibility

At the very beginning of photography this was not a very used term, this was photographers were able to use safelight to develop and only existed plates, so to develop them they used trays. They made the shot, with some known time and aperture, and then during the developing process they could see how the image appear and stop the process when they tough it has reached the best image. But as photography was becoming more mainstream, due to cinema and companies like Kodak, research and new technology changed the films sensibility to light and with it, the need to name that sensibility.

In the United States the American Standards Agency (ASA, now is it called ANSI), had the most influence in the Americas and Japan about how to call the film speed, while in Europe was Deutsches Institut für Normung (DIN) the one responsible for such labor. It is something like International System of Measurements and Imperial System, both told the same thing but with different scales, each institution made their own experiments on how to determine film speed. As time advance to a much more standardized World, International Organization for Standardization (ISO) was born, this Organization decided to use the two systems, so when one buys a film in the box comes as ISO 400/27º. I, as a Mexican, live under the ASA concepts then adopted by ISO. But both scales are direct one with another, interchangeable without any mathematical operation or so, not as 1 ft moreless equals 0.30 m. Most common values are:

ASA        DIN
50        18
100       21
200       24
400       27
800       30
1600     33
3200    36

As you can see ASA scale work with doubles and halfs, 100 being the double of 50, and 1600 being the half of 3600. In the other hand DIN goes in sums of three between each other, as 18 plus 3 gives 21 for the next film sensibility, but as long as now I have not explained what this numbers represent. 

So now going on, the smaller the number the lesser the sensibility is going to be, this means it is going to need a lot of light to be well exposed, and as the number goes higher the sensibility grows with it, meaning you will not need many light to have a good exposure. And the relationship each one with the another is going to be the doble or the half. Ej. lets took ISO 100/21º, if we go to 50/18º this will tell that we are going to need the double of light to have a good exposure, compared to 100/21º, and viceversa with 200/24º, it is going to need the half of light needed for 100/21º to get the same exposure. But the next question is going to be, Why to have different film speeds? If we are able to shot almost in any condition with 800/30º, for example.

Well there are some cons and pros, depending on which film speed we are intending to use. Film speed is also related to the size of the silver halides the emulsion contains, as smaller the number is, the salts are going to be smaller, which is going to be handy if we want to have the most definition of the image we intend to capture, very useful in landscape, product or studio and maybe portraits. But with the cost of needing a lot of light to achieve a good exposure, so in the cases of landscape tripod is going to be mandatory, in the studio, well we are going to be controlling light via lamps, flashes and using an exposure meter, and in portraits, well as we are going to see later,  wide open lens apertures; we also gain better contrast* with lower ISO values. That is why the largest photos ever are made with low ISO values, as it grants the best definition. But in special cases as sport photography, scientific, and places in which light is not the best of all or we need to achieve the photo we want, the cost is a little loss of sharpness and contrast, as higher ISO values have bigger silver halide grains. 

A way to classify higher or lower ISO's is the next: take for instance 100/21º as the mid-point, below that value, even as low as 6/9º they are called slow emulsions or films, as explained earlier, a lot of light is needed. Then, from 100/21º to 400/27º are the mid-term speed films, more likely as the standard, as you have a balance between outdoors and indoors using artificial light (as lamps or flashes), and medium sized grains. Higher than 400/27º are called quick films, as low light is needed to expose.

The last technologies applied to Black and White photography were made by Kodak and Ilford, as they in the late 80's and 90's developed their T-Max and Delta series. They found a way to give the grains certain shape, Kodak saw T's and Ilford saw ∆'s (capital letter delta), which made possible to arrange them better, and with that more sensibility with smaller grains. Both films are marketed as Pro films. As I know Kodak sells T-Max 100/21º, 400/27º and 3200/36ª (really 800/30º, but can easily pushed to 3200/36º), and the best results are given if you develop with T-Max developer (very self-explanatory) and in the other hand Ilford's are 100/21º, 400/27º (can be used as 200/24º to 3200/36º) and 3600/36º (really being 1000/31º, but can be pushed to 12500/42º), the best results with this films are obtained using at least ID-11 developer, but are better using Mircophen.

So before hitting the street with you camera, and if it isn't loaded, stop and think to which situations are you going to be facing, because that is going to be the best parameter to select a film. If you are going to be out in a sunny day, without any trouble you can use ISO 100/21º, but if you are going to be in a familiar reunion inside a house better choose 400/27º, or any sports event better go higher, even if it is sunny.


*Contrast, for me, is like how intense are the whites and the blacks. For example: in high contrast you will only see whites and blacks but not so many grays, in low contrast you will not see white or black just a big range of grays. Depending on what are you going to achieve at the start it is better to look for a medium contrast, the one that is going to have white, black and the variety of grays.